Reproducible Science - Automation
Tutorial on creating a reproducible python package.
Introduction
This tutorial will teach you how to automate your data analysis using TAPIS.
Module Learning Objectives
In this example, we will show you how to setup automated analysis that is triggered when a file is uploaded to TACC.
Participants are strongly encouraged to follow along on the command line. After completing this module, participants should be able to:
- Create a TAPIS notification when files are uploaded to a specific location
- Trigger an Abaco actor in response to a notification
- Use an Abaco actor to submit an job to an Application
And we’re going to work backwards, first creating the tpp, then the actor, and finally the notification.
Why is this important?
As you develop your computational skills, you will find that these skill are in high demand. Basic operations like moving files, interpreting metadata, initiating scripts, and formatting outputs will take up and inordinate amount of your time and are boring. If you can standardize your process for data ingest, you can automate the boring parts of your work. And can instead devote more time to interpreting your analysis and working on a new, improved version of your pipeline. Moreover, automating analysis will standardize the processing of your data, so in 6 months from now when your computational results have been verified experimentally you can go look back at what version of the application was run, what the parameters were, and write your methods section accordingly. Instead of having to guess or remember what you did, you can just check the records.
Don’t underestimate the time-saving value of automation! Check out this informative chart from XKCD
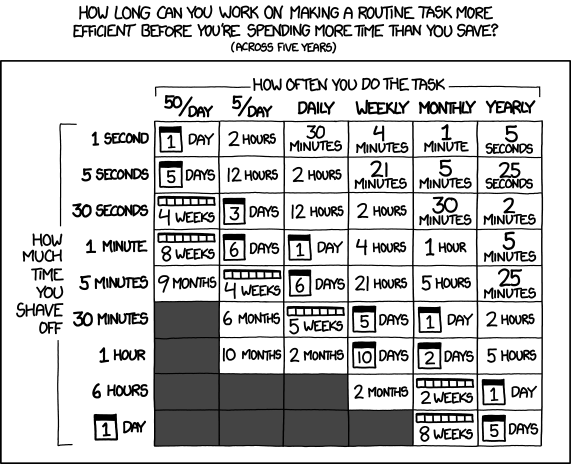
This module is about 90 minutes, so if this process shaves 30 seconds off of something you do once a week, or shaves 30 minutes off something you do once a year, then it’s worth the time investment!
Requirements
- Accounts
- Software
- Python 3
- git
- python pip
- Tapis CLI
- Docker CE
- Storage and Execution systems setup from the TAPIS module
Deploying An Application
We’re going to take some of what we’ve learned from best practices and put it into, well, practice. Apps deploy is a CLI command that will build a docker container, push it to dockerhub, upload your app asset bundle to a deploymentSystem, and register your app on an executionSystem all in a single step. Apps deploy is a single command that replaces:
docker build -t $DOCKER_USERNAME/$DOCKER_REPO:$DOCKER_TAG -f Dockerfile
docker push $DOCKER_USERNAME/$DOCKER_REPO:$DOCKER_TAG
tapis files upload agave://$DEPLOYMENT_SYSTEM/$DEPLOYMENT_PATH/ runner.sh
tapis apps create -F app.json
And we plan on adding even more in the future! Namely an automatic upload to GitHub so there’s a source controlled snapshot of each deployment.
Setup Tapis CLI
Let’s go ahead and install the TAPIS CLI on your host system:
pip install tapis-cli
And re-run:
tapis auth init
Or, if you want to be clever, move over the authentication directory we created last week:
cp -R ~/.tapis ~/.agave
To check Tapis is setup correctly, you can run:
tapis systems search --public eq false
and you should see the storage and executions systems we setup last week.
Docker CLI Tangent
You might be wondering: “Can I just re-use the TAPIS container the same way we did last week?”. And yes, you can, but there are some caveats. See this tangent for more info.
Copy an Application from Github
Let’s create a Tapis app to perform some analysis.
For this example we’ll create a fastqc application that is triggered when .fastq
files are uploaded to a certain directory, but you can use any application or file type
for this.
You can clone the fastqc example app from here:
git clone https://github.com/JoshuaUrrutia/fastqc_app.git
cd fastqc_app
Or, if you’d like, you’re welcome to use application that was created last week: https://tacc.github.io/summer-institute-2020-tapis/block2/apps/
Find deploymentPath
Remember the storage system we created last week?
1 2 3 4 5 6 7 8 9 10 11 12 13 14 15 16 17 18 19 20 21 22 23 | {
"id": "UPDATEUSERNAME.stampede2.storage",
"name": "Storage system S2",
"status": "UP",
"type": "STORAGE",
"description": "Storage system for TACC cloud storage on S2",
"site": "www.tacc.utexas.edu",
"public": false,
"default": true,
"storage": {
"host": "stampede2.tacc.utexas.edu",
"port": 22,
"protocol": "SFTP",
"rootDir": "/",
"homeDir": "/work/dir../UPDATEUSERNAME/stampede2",
"auth": {
"username": "UPDATEUSERNAME",
"publicKey":"paste public key here",
"privateKey":"paste private key here",
"type": "SSHKEYS"
}
}
}
|
By default our write operations when we run tapis apps deploy will write to
the rootDir above. If you plan on deploying lots of apps, it’s a good idea
to redefine the rootDir on your system to be a directory
where you have write access, for example replacing the rootDir with your
homeDir: /work/dir../UPDATEUSERNAME/stampede2. This will simplify the
structure of your app.ini file, and you won’t have to lookup
or remember your directory number when listing and uploading files.
But, since this system is already created, we’ll just grab the
absolute path to the homeDir directory where we have write access.
To get a full listing of your system, run:
tapis systems show -f json $USERNAME.stampede2.storage
And look for the "homeDir" key in the json response:
"homeDir": "/work/05369/urrutia/stampede2/"
Ok and now we’ll create a directory called apps where we’ll store all our app bundles.
# tapis files mkdir agave://urrutia.stampede2.storage/work/05369/urrutia/stampede2/ apps
tapis files mkdir agave://$USERNAME.stampede2.storage/$HOME_DIR apps
Edit the app.ini file
Replace the docker username and storage_path in the app.ini, with your docker username
and your homeDir (the location on your storage system where you have write access).
1 2 3 4 5 6 7 8 9 10 11 12 13 14 15 16 17 18 19 20 21 22 | [app]
name = fastqc
label = fastqc
description = FastQC app to assess fastq quality
version = 0.11.9
storage_system = stampede2.storage
storage_path = /work/05369/urrutia/stampede2/
hpc_system = stampede2.execution
bundle = assets
[docker]
dockerfile = Dockerfile
namespace = jurrutia
repo = fastqc_app
tag = 0.11.9
[env]
[git]
branch = main
|
The contents of the app.ini file will be injected into your app definition (app.json):
1 2 3 4 5 6 7 8 9 10 11 12 13 14 15 16 17 18 19 20 21 22 23 24 25 26 27 28 29 30 31 32 33 34 35 36 37 38 39 40 41 42 43 44 45 46 | {
"name": "{{ agave.username }}-{{ app.name }}",
"version": "{{ app.version }}",
"executionType": "HPC",
"executionSystem": "{{ agave.username }}.{{ app.hpc_system}}",
"parallelism": "SERIAL",
"deploymentPath": "{{ app.storage_path}}/apps/{{ app.name }}-{{ app.version }}",
"deploymentSystem": "{{ agave.username }}.{{ app.storage_system}}",
"defaultProcessorsPerNode": 1,
"defaultNodeCount": 1,
"defaultQueue": "normal",
"label": "FastQC",
"modules": ["load tacc-singularity"],
"shortDescription": "{{ app.description }}",
"templatePath": "runner-template.sh",
"testPath": "tester.sh",
"inputs": [
{
"id": "fastq",
"value": {
"default": "agave://data.iplantcollaborative.org/urrutia//sample/reads1.fastq.gz",
"visible": true,
"required": true
},
"semantics": {
"ontology": [
"http://edamontology.org/format_1930"
]
},
"details": {
"label": "FASTQ sequence file"
}
}
],
"parameters": [{
"id": "CONTAINER_IMAGE",
"value": {
"default": "{{ docker.organization }}/{{ docker.repo }}:{{ docker.tag }}",
"description": "Container Image. Do not edit.",
"type": "string",
"visible": false,
"required": true
}
}],
"outputs": []
}
|
Deploy the Application
All that’s left now is to deploy the application from the FastQC repo:
tapis apps deploy
Which should print out a table like this:
+--------+---------------------------------------------------------------------------------------------------------------------------------------------------------------------------------------------+
| stage | message |
+--------+---------------------------------------------------------------------------------------------------------------------------------------------------------------------------------------------+
| build | Step 1/4 : FROM python:3.8 |
| build | ---> ea8c3fb3cd86 |
| | |
| build | Step 2/4 : RUN apt-get update && apt-get upgrade -y && apt-get install wget -y && apt-get install zip -y && apt-get install default-jre -y |
| build | ---> Using cache |
| | |
| build | ---> f0f2bd1f3194 |
| | |
| build | Step 3/4 : RUN wget https://www.bioinformatics.babraham.ac.uk/projects/fastqc/fastqc_v0.11.9.zip && unzip fastqc_v0.11.9.zip && rm fastqc_v0.11.9.zip && chmod +x FastQC/fastqc |
| build | ---> Using cache |
| | |
| build | ---> 3bea8add49b6 |
| | |
| build | Step 4/4 : ENV PATH "/FastQC/:$PATH" |
| build | ---> Using cache |
| | |
| build | ---> cfafe349377a |
| | |
| build | Successfully built cfafe349377a |
| | |
| build | Successfully tagged jurrutia/fastqc_app:0.11.9 |
| | |
| push | The push refers to repository [docker.io/jurrutia/fastqc_app] |
| push | 0.11.9: digest: sha256:4ee48dae892538f83b69d6a1a7dbf099c51d3d032e44d0241518984897b5274f size: 2642 |
| upload | assets/runner-template.sh |
| upload | assets/tester.sh |
| upload | assets/_lib/CONTAINER_IMAGE |
| upload | assets/_lib/extend-runtime.sh |
| create | Created Tapis app urrutia-fastqc-0.11.9 revision 1 |
+--------+---------------------------------------------------------------------------------------------------------------------------------------------------------------------------------------------+
Deploying an Actor
- What is an actor? See more info in our documentation:
Basically a Tapis actor is a script, that lives in the cloud, and does something for you. It’s not for compute intensive jobs, that’s what apps are for, it’s designed to be quick, responsive, and lightweight.
We’re going to deploy an actor that will receive a notification when a file is uploaded,
create a Tapis job.json, and submit that job to our FastQC application.
Copy a Reactor from Github
Clone a Abaco reactor I created to submit FastQC jobs:
git clone https://github.com/JoshuaUrrutia/fastqc_router_reactor.git
Edit actor.ini and config.yml
We’ll need to make edits to actor.ini so that it points to your dockerhub username:
1 2 3 4 5 6 7 8 9 | [actor]
name = fastqc_router
token = True
[docker]
dockerfile = Dockerfile
namespace = jurrutia
repo = fastqc_router
tag = 0.2
|
And change the name of the app in config.yml, so it matches your app id. And
change the email address there so the notification is sent to your email:
1 2 3 4 5 6 7 8 9 10 11 12 13 14 15 16 | ---
logs:
level: DEBUG
token: ~
fastqc:
appId: urrutia-fastqc-0.11.9
name: fastqc_test
archive: true
archivePath: ""
archiveSystem: ""
inputs:
fastq: ""
notifications:
-
event: FINISHED
url: your@email.com
|
Now we create an empty secrets.json file. It’s just empty in this example, but
if you had passwords or credentials you wanted to be available in your actor, you
could add those to the secrets.json. It is included in the .gitignore file for this
repo so you don’t accidentally push a password to github.
cp secrets.json.sample secrets.json
Deploy the Actor
All that’s left is to deploy our reactor:
tapis actors deploy
You should see a response like:
Building jurrutia/fastqc_router:0.1
Finished (27932 msec)
Pushing jurrutia/fastqc_router:0.1
Finished (9354 msec)
+--------+-------------------------------------------------------------------------------------------------+
| stage | message |
+--------+-------------------------------------------------------------------------------------------------+
| build | Step 1/1 : FROM jurrutia/reactors:python2-edge |
| build | # Executing 5 build trigger |
| build | s |
| build | ---> Running in 34bf66e2e455 |
| | |
| build | You must give at least one requirement to install (see "pip help install") |
| | |
| build | Removing intermediate container 34bf66e2e455 |
| | |
| build | ---> ca9ae97aef39 |
| | |
| build | Successfully built ca9ae97aef39 |
| | |
| build | Successfully tagged jurrutia/fastqc_router:0.1 |
| | |
| push | The push refers to repository [docker.io/jurrutia/fastqc_router] |
| push | 0.1: digest: sha256:844f0ce2de5e03f1f15fedb64b7f5354bf64da453a18c87c6cb5c9981e6e8991 size: 6978 |
| create | Created Tapis actor X4blX3Ez65qQZ |
| cache | Cached actor identifier to disk |
+--------+-------------------------------------------------------------------------------------------------+
Copy your actor id (X4blX3Ez65qQZ in the above example).
If you forget the id, you can always list out your actors with tapis actors list.
Create a FastQC Folder
Now we’ll create the fastqc folder on our storage system. After we create our
notification, any file that is uploaded here will be analyzed automatically by
our FastQC app!
# tapis files mkdir agave://urrutia.stampede2.storage/work/05369/urrutia/stampede2 fastqc
tapis files mkdir agave://$USERNAME.stampede2.storage/$HOME_DIR fastqc
Create File System Notifications
Now you’re ready to create a file system notification.
This notification will pass a message to the fastqc_router_reactor when a file
is uploaded to the fastqc directory on your storage system. The fastqc_router_reactor takes
this notification, crafts a job.json, and submits a job to the fastqc_app.
We’ve created a python wrapper to help setup the file system notifications,
you can download the python scripts here:
git clone https://github.com/JoshuaUrrutia/abaco_notifications.git
cd abaco_notifications
From the abaco_notifications directory, you can run add_notify_reactor.py to
setup a notification. For example:
# python add_notify_reactor.py urrutia.stampede2.storage /work/05369/urrutia/stampede2/fastqc X4blX3Ez65qQZ
python add_notify_reactor.py $AGAVE_SYSTEM_NAME $PATH_TO_DIRECTORY $ACTOR_ID
If it runs successfully your response should look like:
assocationIds = 8216966626126028310-242ac112-0001-002
notification id: 18251060861323945066-242ac116-0001-011
notification url: https://portals-api.tacc.utexas.edu/actors/v2/X4blX3Ez65qQZ/messages?x-nonce=PORTALS_baTEq5E5oylx
If there are incompatibilities with your version of python you can also use a containerized version of add_notify_reactor.py:
docker run --rm -it \
-v ${HOME}/.agave:/root/.agave \
jurrutia/add_notify_reactor:0.1 \
python /opt/add_notify_reactor.py \
$AGAVE_SYSTEM_NAME \
$PATH_TO_DIRECTORY \
$ACTOR_ID
And you can see all your notification using the notifications endpoint:
tapis notifications list
Upload and Test
Now the only thing left to do is to test and see if our
upload -> notification -> reactor -> app
chain is functioning.
Upload a fastq file to your FastQC directory (you can find a copy of this file in
the fastqc_app/tests/ repo):
# tapis files upload agave://urrutia.stampede2.storage/work/05369/urrutia/stampede2/fastqc reads1.fastq.gz
tapis files upload agave://$SYSTEM/$PATH/ $FILE
Now that we’ve uploaded lets see if our actor was triggered:
tapis actors execs list $ACTOR_ID
The response should look like:
urrutia$ tapis actors execs list X4blX3Ez65qQZ
+---------------+----------+
| executionId | status |
+---------------+----------+
| AqDao7YgEYZ6Z | COMPLETE |
+---------------+----------+
If you want to see the logs from your actor execution you can run:
tapis actors execs logs $ACTOR_ID $EXECUTION_ID
Finally, let’s check to see if a job was submitted to our application:
tapis jobs list
+------------------------------------------+--------------------------------+----------+
| id | name | status |
+------------------------------------------+--------------------------------+----------+
| 485458bc-335d-4d05-ae30-70de2583b6d5-007 | fastqc_test | FINISHED |
+------------------------------------------+--------------------------------+----------+
And go ahead and download the outputs of that job:
# tapis jobs outputs download 485458bc-335d-4d05-ae30-70de2583b6d5-007
# cd 485458bc-335d-4d05-ae30-70de2583b6d5-007
tapis jobs outputs download $JOB_ID
cd $JOB_ID
open reads1_fastqc.html
Congratulations, you successfully automated part of your workflow with Tapis! But there is no reason to stop here, you can add a notification to your FastQC jobs to trigger a new reactor (and perform an alignment maybe?), and build an entirely automated workflow by chaining together reactors and apps.
Troubleshooting
Notifications
If the reactor never executed, you can check the notifications
are working by posting notifications to PostBin using the
add_notify_requestbin.py script in the abaco_notifications directory:
python add_notify_requestbin.py $AGAVE_SYSTEM_NAME $PATH_TO_DIRECTORY
assocationIds = 344770698063965720-242ac112-0001-002
notification id: 8583029518113566230-242ac118-0001-011
notification url: https://postb.in/b/1595427632961-4801140406634
You can re-upload the file and check the requestbin url to see if it receives the notification:
# tapis files upload agave://urrutia.stampede2.storage/work/05369/urrutia/stampede2/fastqc reads1.fastq.gz
tapis files upload agave://$SYSTEM/$PATH/ $FILE
You can go to the PostBin URL to see all the requests, and to get more information about a specific request you can copy/paste the Request ID into a browser in this format:
# https://postb.in/api/bin/1595427632961-4801140406634/req/1595427686559-6457259773742
https://postb.in/api/bin/$BIN_ID/req/$REQUEST_ID

Added to many notificatons? You can delete them individually with:
tapis notifications delete $NOTIFICATON_ID
Or, if you just want to git rid of all your notifications, you can run:
tapis notifications list -c id -f value | xargs -n 1 tapis notifications delete
Reactor
If the reactor executed, but did not launch your app, you can check the reactor logs:
tapis actors execs logs $ACTOR_ID $EXECUTION_ID
You can then edit your reactor.py or config.yml as needed, and redeploy the actor.
If you want to redeploy your reactor but don’t want to re-create
the notification, you can deploy your reactor to the same actor id with:
# tapis actors deploy -I X4blX3Ez65qQZ
tapis actors deploy -I $ACTOR_ID
Application
If the app launched, but you are not getting the output you expect, you can check the app logs. Run jobs-list to find the relevant job_ID, then you can run:
# tapis jobs outputs download 485458bc-335d-4d05-ae30-70de2583b6d5-007
tapis jobs show $JOB_ID
# and check the lastStatusMessage
tapis jobs outputs download $JOB_ID
# and check the .err and .our files